Wednesday, June 25, 2014

Slow Cooker Pulled Pork

Until you've made pulled pork, you think that it's something quite time consuming and special.  And hey, I'm not saying that it's not a thing of beauty, but it's reeeallll easy to make.  Probably one of the easiest things that I make.  I will also warn you that you shouldn't probably go making this every week because it isn't the healthiest of meals, but it is a nice treat every once in a while.  This recipe is also amazing if you're having company because it feeds a lot of people at a good price and it's one of those things that you can set it and forget it (correct me if I'm wrong, but that was a line from an infomercial once upon a time, no?)  Anyways not much to say about this one except it is delicious and pretty hard to screw up, so it's great for beginners and a great way to cook during the summer that isn't going to heat your whole house up!

S L O W  C O O K E R  P U L L E D  P O R K    R E C I P E

Ingredients
☂ 4-5 lb. pork shoulder
☂ 2 Tbsp. brown sugar
☂ ½ Tbsp. cumin
☂ 1 tsp. cinnamon
☂ 1 Tbsp. garlic powder
☂ 1½ Tbsp. chili powder
☂ 1½ Tbsp. salt
☂ 1 tsp. coriander
☂ 1 Tbsp. paprika
☂ 1 tsp. black pepper
☂ 2 red onions, thinly sliced
☂ 1 cup low-sodium chicken broth

Directions
☂ Heat slow cooker to the 6 hour high heat setting or the 8-10 hour low heat depending on how long you wish to cook it (it becomes more tender when you cook it on low for a longer amount of time.)
☂ Place onion slices and chicken broth at the bottom of the slow cooker to act as a bed for the pork shoulder.
☂ Mix all the seasonings and spices together in a bowl and pat them onto the outside of the pork shoulder, completely covering it.
☂ Place the pork shoulder in the slow cooker and sprinkle any remaining spices over the pork and the onions.  
☂ Put the lid on top of the slow cooker and cook for 6 hours of high or 8 to 10 hours on low.
☂ While the pork is cooking you can whip up some homemade barbecue sauce.  I always use my recipe for Texas BBQ sauce that I definitely recommend making with this!
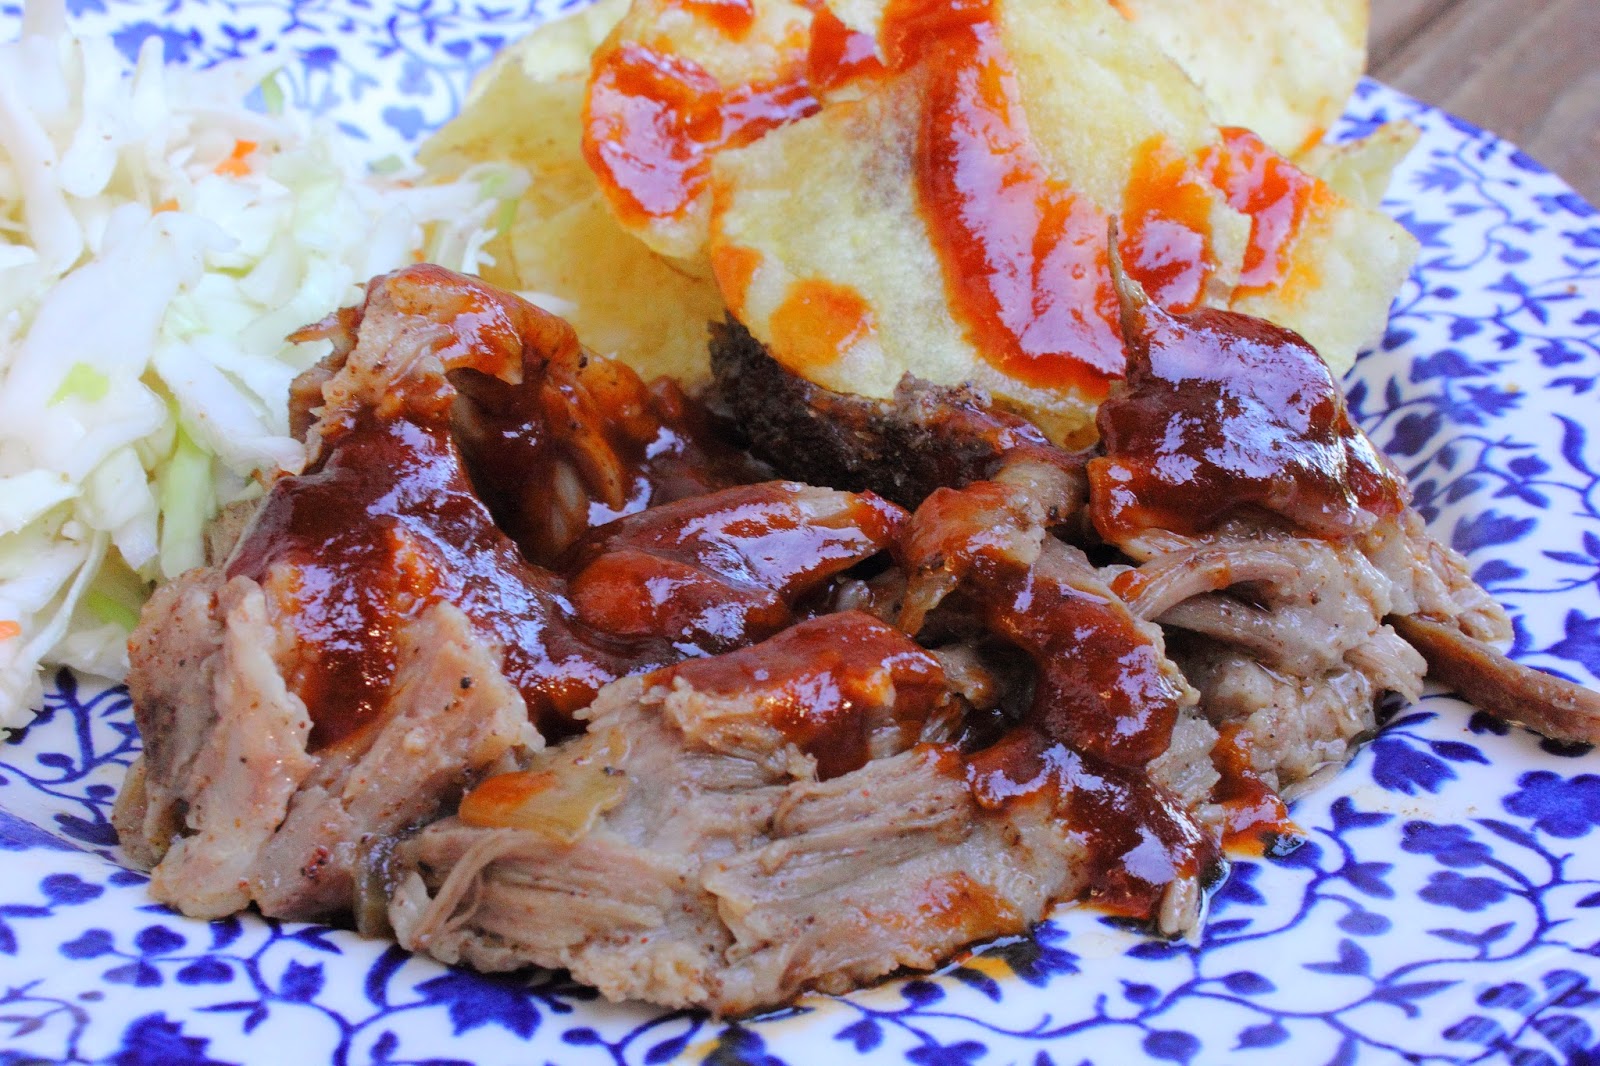
☂ After the pork has cooked, pull it out of the slow cooker and shred with two forks.  To make sure the pork isn't dry, moisten it with a few tablespoons of the liquid it cooked in and top it off with the cooked onions and barbecue sauce.
☂ I love to serve this with some tangy vinegar based coleslaw and kettle sea salt and vinegar chips all smothered in homemade barbecue sauce, but feel free to serve it on buns, on pizza, or just on its own.  Whatever your heart desires.
☂ WALAH!  Enjoy and start feeling nourished

Saturday, June 21, 2014

Southwest Corn Salad


One day when I was younger I decided I didn't like corn on the cob.  You see my family has barbecues pretty frequently and growing up we would always have the same thing: a steak, corn on the cob, and a baked potato.  Except for me, I wouldn't have the corn.  I don't know when I decided I didn't like it, but for some weird reason I did.  Up until this past year I still would never eat it because my family never bought it for me knowing that I "didn't like it."  Thinking about it, it's seeming weirder and weirder but I guess after all those years of having it reinforced that I didn't eat corn on the cob, I didn't.  I will state however I ate corn in other things, just not from the cob, it was always canned corn.  That is up until this past year when I tasted corn on the cob and realized how absolutely delicious it was and sweet!  It was a whole different experience than my canned corn and I felt like a fool, a real fool.  Why had I denied this delicious treat for so long.  Anyways now that that has been cleared up, I try to take many opportunities to eat corn from the cob.  This salad is a great way to really highlight the taste and sweetness of the corn.  It is completely a summer salad and is super light and refreshing.  It is freaking fabulous with salmon, but can be served with any protein.  This recipe is definitely a keeper.


S O U T H W E S T  C O R N  S A L A D         R E C I P E

Ingredients
☂ 5 ears of corn (white, yellow, or a mix of both!)
☂ 1 poblano pepper
☂ ½ of a red onion, chopped

dressing
☂ 2 Tbsp. olive oil
☂ 3 Tbsp. apple cider vinegar
☂ ½ tsp. salt
☂ ½ tsp. black pepper
☂ zest of 1 lime
☂ juice of ½ a lime

Directions
☂ Preheat oven to 350 F.  
☂ While the oven is preheating take the ears of corn and pull out any visible corn silk.  Once the oven has preheated place the ears of corn (still inside the husk) directly on the oven rack.  Bake for 30 minutes.
☂ While the corn is cooking whisk together all of the dressing ingredients.
☂ Once the corn is done cooking pull it out of the oven and leave it for a few minutes to cool.
☂ Now put the oven to broil.  Place the poblano pepper in a small baking dish and rub it lightly with olive oil.
☂ Place it into the broiler and char it for 4 minutes on one side and flip it over and char it for 3 minutes on the other side.  Once that has been charred pull it out of the oven and let it sit.
☂ Remove the husk and corn silk from the corn cobs and cut all the kernels into a bowl (If you cut these on a plate or cutting board the kernels will fly everywhere!)
☂ To the bowl add the red onion and the dressing.
☂ Once the poblano has cooled, cut the top off and remove all the seeds.  Mince up the poblano pepper and add it into the bowl with the salad.  Mix the salad so that everything is coated by the dressing.
☂ WALAH!  Enjoy and start feeling nourished

Tuesday, June 17, 2014

Brussels Sprouts with Panchetta


Last year I briefly babysat two delightful girls.  One thing that stands out to me from the experience was when the oldest clearly stated "Brussels Sprouts are the enemy of kids!"  I thought it was hilarious and I also thought, wow brussel sprouts have a pretty bad rep.  To be honest they were never something I grew up eating, but I can imagine that kids probably hate them because if you just boil them on their own they don't have a whole lot of flavor.  I would also like to state that I don't know what is coming over me, but I'm sort of having a love affair with bacon at the moment.  (Wow I just reread that sentence and felt disgrace).  I'm not saying I judge people who like bacon, it's just always been a little bit gross to me.  I guess until now that is, and now I just want to throw it in everything (don't worry I won't [I realize it's not 2012 and that fad has already been done] but I have been having cravings for it).  I guess it's kind of like sugar, the more you eat it the more you want it, I guess that's true for drugs and a lot of others things too.  I am clearly touching on some hard hitting topics here, but back to the brussels sprouts, they do take a bit of work to clean.  You see they are the kind of vegetable that conveniently have rocks and dirt crammed in them, so it takes a bit of work, but I promise that's the hardest part of the recipe.  The end result is a comforting side dish that can be served with loads of different dishes such as salmon (which I had it with when I made it last and it is ddeeelicious), steak, chicken breast, and I could go on but I don't want to bore you just by listing pretty much any protein (you get it, right?)

B R U S S E L S  S P R O U T S  with          P A N C H E T T A  R E C I P E

Ingredients
☂ 2 1bs. brussels sprouts
☂ 4 oz. package of panchetta (in little cubes)
☂ 1 cup chicken stock
☂ salt and pepper to taste

Directions
☂ To clean brussels sprouts, slightly trim the steam of each one (which is the side with the little nub).  You don't want to cut too much off, but this will help a few of the dirtier outside leaves fall off, and also pull off any of those leaves if they don't already come off.  Then you can either let them soak for 10 minutes, or you can thoroughly wash them over the sink in a colander.
☂ Fill up a large soup pot halfway with water, and place it on a burner on your stove on high heat. Season the water with salt.  Bring the water to a boil and then add the cleaned brussels sprouts.  Cook for 15-25 minutes or until they are cooked enough to stick a fork through with some ease (don't turn them to mush).
☂ While the brussels sprouts are boiling, heat a large skillet (that you have a lid for) to medium heat and add the panchetta.  Cook the panchetta until is has browned, but has no black burn marks.  Once it is cooked transfer the panchetta to a bowl with a slotted spoon, leaving the grease in the pan with the heat turned off.  
☂ Drain the brussels sprouts once they are soft and heat the skillet of panchetta grease to medium high heat.  Add the brussels sprouts to that skillet and fry them in the grease for a few minutes.  Add chicken stock and turn the heat to high and put on the lid.  Let it cook until all the chicken stock is gone (about 15 minutes).  If the brussels sprouts begin to burn turn the heat down.
☂ Once there is no more liquid in the pan turn the heat to medium low and add in the panchetta. Season with salt and pepper to taste. Cook for a few minutes until the panchetta has warmed and serve as a hearty and delicious side!
☂ WALAH!  Enjoy and start feeling nourished

Saturday, June 14, 2014

Thai Panang Chicken Curry


Thai food is probably my favorite kind of food that exists.  I know that's a strong statement, but seriously Thai food has some of the best flavors that I have ever had and BONUS a lot of Thai food is easy to make gluten free.  Plus it doesn't usually have dairy in it so it is a easy food for me to make and eat.  Panang is definitely my favorite flavor of Thai curry although it is a hard choice because who am I kidding I love all Thai curries.  I will point out that I have had bad Thai curry in restaurants before and I do feel lucky to live in the Seattle area where we actually have amazing Asian food.  It is a pretty easy recipe to make, it's just a matter of tracking down all the ingredients (which shouldn't be hard as long as you live in a somewhat diverse area).  If you do find ingredients hard to find I will put in substitutions at the end of the ingredients list.  This is one of my family's favorite dishes that I make and anytime I make it for anyone it is always a hit.  

T H A I  P A N A N G  C H I C K E N  C U R R Y  R E C I P E

Ingredients
☂ 2 large chicken breasts, seasoned with salt and pepper, fully cooked and thinly sliced(should be around 1½ lbs.)
☂ 2 cans coconut milk (make sure they're full fat and not light)
☂ 2 red bell peppers, seeded and sliced
☂ 2 Tbsp. panang curry paste (I use the Aroy-D brand & if you like spicier food you can add more to your liking)
☂ ½ cup water
☂ ½ lb. fresh green beans, trimmed and cut in half
☂ 2½ Tbsp. fish sauce
☂ 2½ Tbsp. brown sugar
☂ 10 kaffir lime leaves (I find these at my local Asian grocery store)
☂ juice of 1 lime
☂ 2 Tbsp. Thai basil leaves, chopped (I also find this at my local Asian grocery store)
☂ cooked rice

substitutions 
☂ if you can't find the kaffir lime leaves you can add the zest of 1-2 limes to taste.
☂ if you can't find the Thai basil you can add regular fresh basil 

Directions
☂ Place a large soup pot on high heat and add in 1 can of coconut milk.  Bring it to a simmer and add in red bell pepper slices and panang curry paste. Mix the curry paste in and let it all simmer for 5-7 minutes.  
☂ Add in green beans, fish sauce, brown sugar, water, kaffir lime leaves, 2nd can of coconut milk, and lime juice.  Let it simmer on high for about 10 minutes, if it starts to burn reduce the temperature to medium or medium-high heat.  
☂ Once the curry has simmered down and thickened turn the heat to medium and add the thinly sliced chicken breasts and thai basil.
☂ Let it simmer together for 3-5 minutes or just until the Thai basil slightly wilts.
Before serving, remove the kaffir lime leaves, they are a little bit hard to eat (kind of like a bay leaf).  
☂ Serve over rice.
☂ WALAH!  Enjoy and start feeling nourished

Wednesday, June 4, 2014

Simple Roast Chicken

Roasting a whole chicken might be a little bit intimidating at first, but trust me it is so ridiculously easy and is one of the most versatile dishes you can make.  I started roasting whole chickens on a regular basis about two years ago because I realized it is substantially cheaper than buying chicken that is cut up.  I try to stock up on them and freeze them when they go on sale for about 89 cents to 99 cents a pound.  The size of the chicken is generally 4-6 pounds making one whole chicken about five dollars.  It is a steal that I think not enough people go for because they are unsure what to do with a whole chicken.  Not only is it cheaper though, the flavor is also significantly better because you are getting all the flavor that comes from the bones.  Plus, once you have taken the meat off of the chicken you can use the bones to make stock by putting them in a large pot with carrots, celery, and water.  Basically it's just a good bang for your buck.  You can use the chicken as it is, in a salad, soup, or a sandwich.  Some of my favorite ways to use it is for my chicken tortilla soup, bbq chicken sandwiches with homemade bbq sauce, and mixed together with fresh veggies in a salad with my honey mustard salad dressing.  The recipe that I'm providing for roast chicken is in its simplest form, but feel free to add your favorite spices and herbs to cater it more towards your preferences (I enjoy it with rosemary, garlic, lemon zest).  I do want to state that although this recipe is simple the flavor of the chicken is still really delicious.

S I M P L E  R O A S T  C H I C K E N         R E C I P E

Ingredients
 1 whole roasting chicken (mine was 5½ lbs. but just get one as close to that size as you can)
 1 tsp. salt
 ½ tsp. black pepper
 2 Tbsp. olive oil

Directions
 Preheat oven to 425 F.
 Place chicken on a baking sheet, breast side up, with raised edges.  Pat the chicken with paper towels so that the outside of the chicken is dry.  Remove the insides of the chicken (They don't always come with these but just make sure to check, they are often wrapped in parchment paper).  You can use the insides to make a gravy, but I normally just toss them.
 Sprinkle chicken with salt, black pepper, and olive oil.  (It may seem like a lot of seasoning, but it is for the whole chicken.)
 Cover the baking sheet with aluminum foil so that the chicken is covered, but leave the sides open so that the  chicken has some ventilation.
 Cook the chicken for 1½ hours.  After that remove the foil from the top of the chicken and let it cook uncovered for 10 minutes, or until golden brown on top.  Once it has reached that point turn off the oven and let it sit in the oven for five more minutes so that the oil and liquid in the baking sheet doesn't violently splatter on you as you take it out.  
 Once you remove the chicken from the oven let it sit for 10 minutes for the juices to settle so that you don't have a dry chicken.
 WALAH!  Enjoy and start feeling nourished


Monday, June 2, 2014

Cod Milanese

I work as a personal chef for a couple and a few weeks back I made them Chicken Milanese.  Dear God did I have some serious food envy.  It was not the healthiest looking recipe, but it did look delicious.  While I was making it I was thinking I NEED to make this.  I wasn't sure how I was going to make this in a way that I could eat this and the idea left my mind.  Then a few days ago I was meal planning for my family's week of food (which is something I never do, but I neeed to do this more because it is so much simpler!  I mean first of all you don't have to grocery shop every other day and there is so much less stress when you're running out of time the night of thinking what are we going to eat?!) I was looking at what was on sale at my grocery store and they were having a special on cod.  The light bulb went off in my head and I just thought I'm going to make this with cod and just wing it, it can't be too hard.  So just going off what I remembered about the recipe I made for the couple, I sort of adapted it in a gluten, dairy & egg free way and a little bit healthier because of the cod.  The results were super yummy and satisfying.  

C O D  M I L A N E S E  R E C I P E

Ingredients
 2½ lbs. cod
    cup gluten free all-purpose flour (I used Bob's Red Mill)
 ¼ cup potato starch (if you can't find this at your grocery store it's available on amazon)
 ½ tsp. salt
 ½ cup plain soy milk
 6 Tbsp. olive oil

milanese sauce
 ½ cup white wine
 3 Tbsp. earth balance (or any non dairy butter)
 juice of 1 lemon
 1½ Tbsp. capers, chopped

Directions
 Pat cod with paper towels so that it is dry on the outside (this will help with breading).  Cut cod into serving size pieces.
 Prepare two shallow bowls and a plate.  In the first bowl pour in the soy milk.  In the second bowl combine gluten free flour, potato starch, and salt.
 Take each individual piece of cod and coat in soy milk and then bread in the flour mix and place on the plate.  
 Once all the cod is breaded heat a large pan to medium-high heat and add 3 Tbsp. of olive oil.
 When the oil is hot add in half of the cod and cook for about 4 minutes on one side (until golden brown) and then flip and cook until fish is cooked through (another few minutes).  Place the cod on paper towel lined plates.
 Once the first batch of cod is cooked add in 3 more Tbsp. of olive oil to the pan and add in the second batch of cod.  If the pan has gotten too hot turn it down to medium (you don't want the outside to burn or cook too fast).  Cook it with the same method as you cooked the first and then place on paper towel lined plates when done.  
 In the same pan you just cooked the cod in, add white wine and let it reduce for a minute.  Now add in lemon juice, earth balance, and capers.  Cook for a few minutes for the sauce to reduce and come together.
 To serve, spoon a couple teaspoons of sauce over each piece of cod.  Do not pour the sauce over all of the cod because the cod will get soggy and any leftovers will not hold up as well.
 WALAH!  Enjoy and start feeling nourished